This project is more than a technical exercise—it's a small act of defiance against centralized infrastructure, and a gesture of care toward the planet. Fomentum Solis is about inviting the sun into our digital systems, and letting nature shape our online presence.
This guide documents my journey to create a fully solar-powered web server using a Raspberry Pi. I'm sharing this setup to help others interested in off-grid, sustainable hosting solutions.
The code for this project is available on GitHub. I welcome contributions and suggestions for improvement.
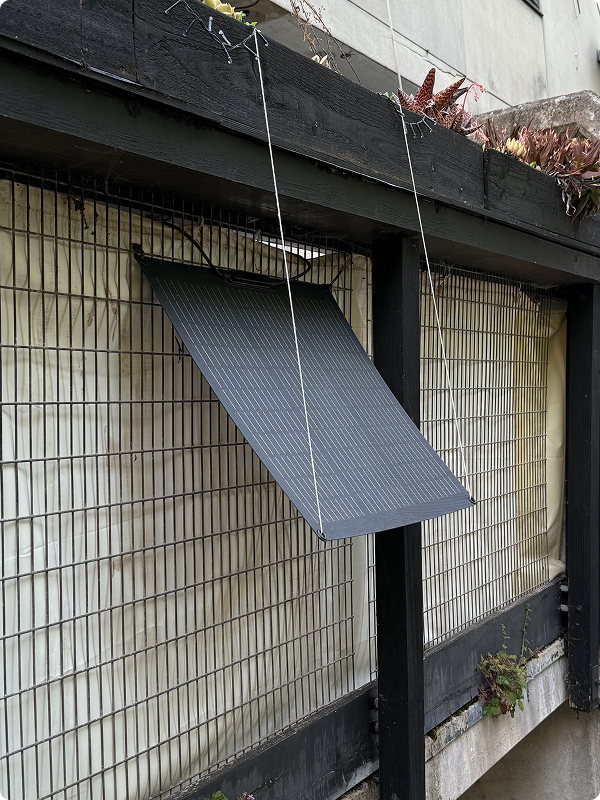
The full system is shown below
The internet consumes a staggering amount of energy—by some estimates, 10% of global electricity production. Most websites are hosted in large data centers that, despite efficiency improvements, still have enormous carbon footprints.
Solar hosting offers an alternative path. By powering web servers directly from renewable energy, we can create truly sustainable digital spaces that function with minimal environmental impact. It also helps build resilience by reducing dependency on centralized infrastructure and traditional power grids.
I believe strongly in sharing knowledge and resources so that others can experiment with sustainable technology solutions. This open approach not only democratizes access to green technology but also fosters innovation through collaborative improvement.
In developing this website, I've prioritized a lightweight, accessible design that works harmoniously with solar-powered hosting. My design philosophy balances several key considerations:
Several pioneering projects have influenced my approach to solar web design:
Solar Protocol – A truly innovative network that routes web traffic according to the logic of the sun. The server that receives any given request is whichever one is generating the most solar energy at that moment. This project elegantly demonstrates how natural intelligence (the sun's movement) can replace artificial intelligence in networking protocols.
Low-Tech Magazine's Solar Website – This groundbreaking website runs entirely on solar power, using a radically reduced design approach. When sunlight is scarce, the website goes offline rather than falling back to grid power. Their dithered images, minimal JavaScript, and static site design have been particularly influential in my approach.
Solar Web Design Guidelines – This open-source resource provides practical techniques for creating lightweight, energy-efficient websites. Their comprehensive documentation on creating static sites, optimizing images, and minimizing server requests has informed many of my design decisions.
Here's what you'll need for this solar hosting project:
Before building any solar system, you need to understand your power requirements. Here's how I calculated mine:
I intentionally oversized my panel (50W) to account for cloudy days, charging inefficiencies, and the realities of non-optimal panel placement. This provides a better safety margin for continuous operation.
The solar panel installation requires careful consideration of positioning and connection. The panel needs to be positioned to maximize sun exposure. I used the free tool SunCalc to understand the best positioning. In my case, this meant finding a south-facing location (in the Northern Hemisphere) with minimal shading throughout the day. The flexible nature of the panel allows for alternate mounting options.
I used a SARONIC 50W flexible solar panel with these specifications:
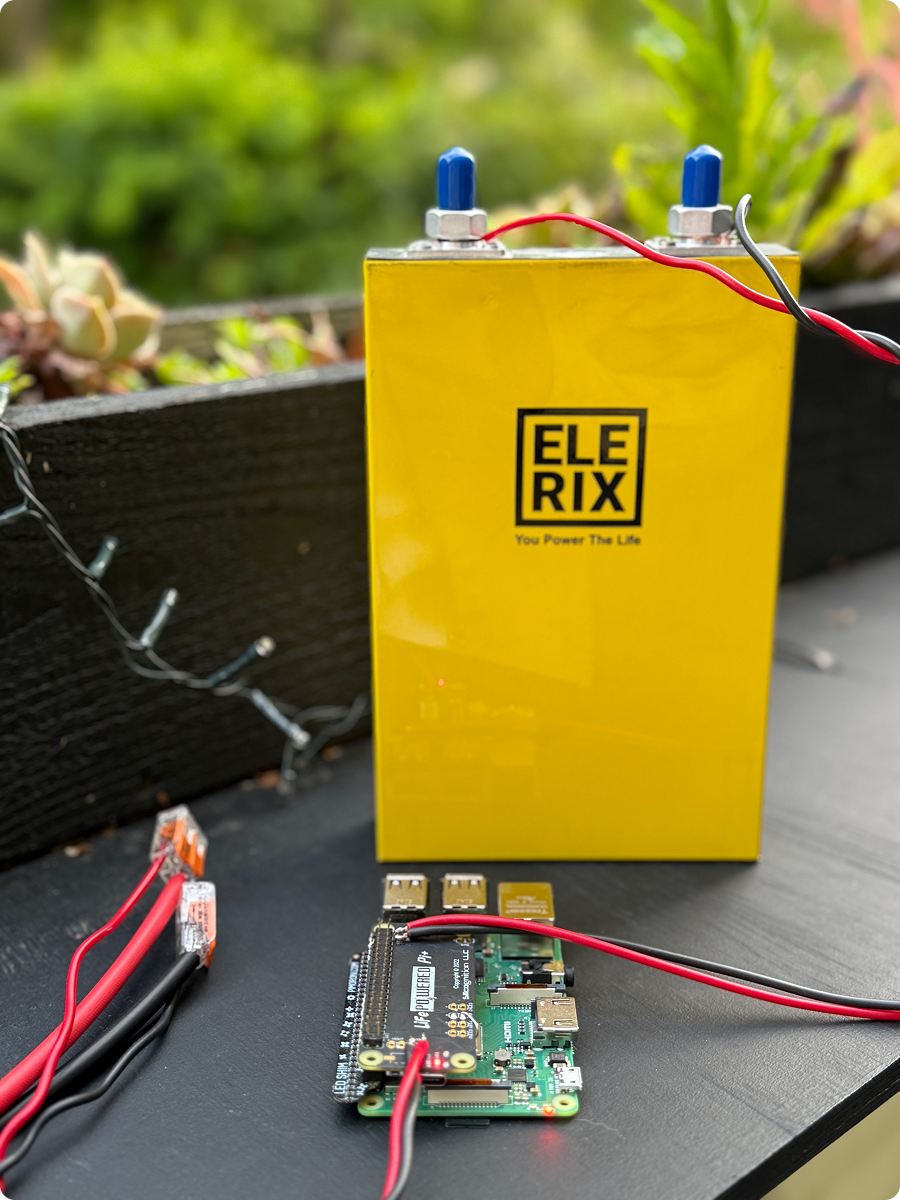
I chose a Lithium Iron Phosphate (LiFePO4) battery for this project for several important reasons:
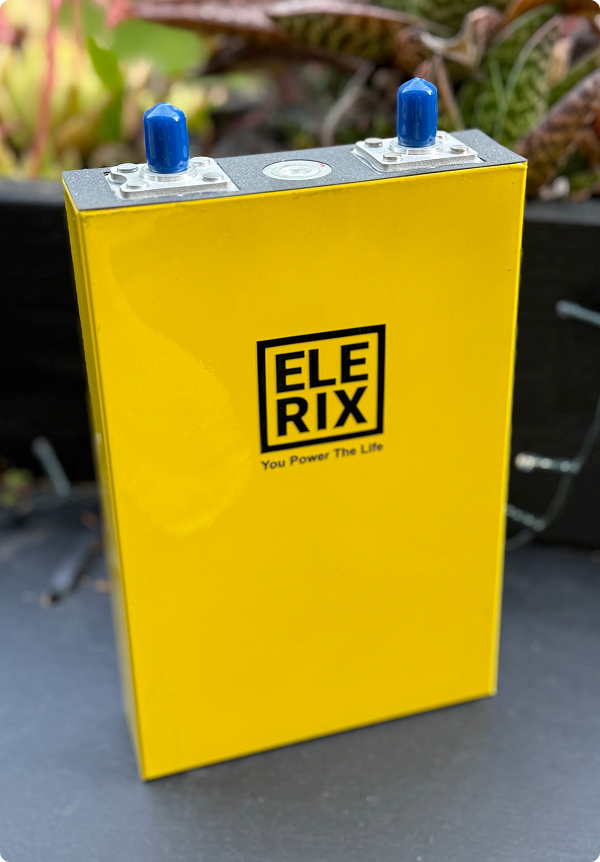
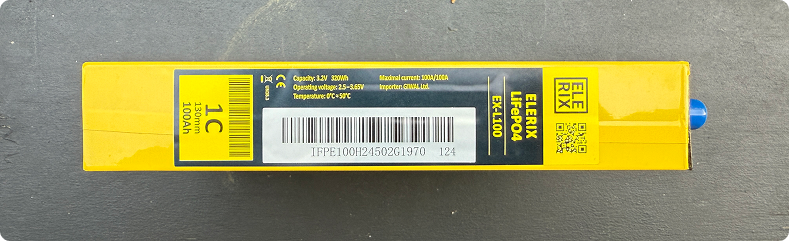
The ELERIX 3.2V 100Ah LiFePO4 battery I selected provides 320Wh of capacity, which gives approximately 6 days of runtime with no sun. This is ideal for short periods of cloudy weather without requiring an excessively large battery.
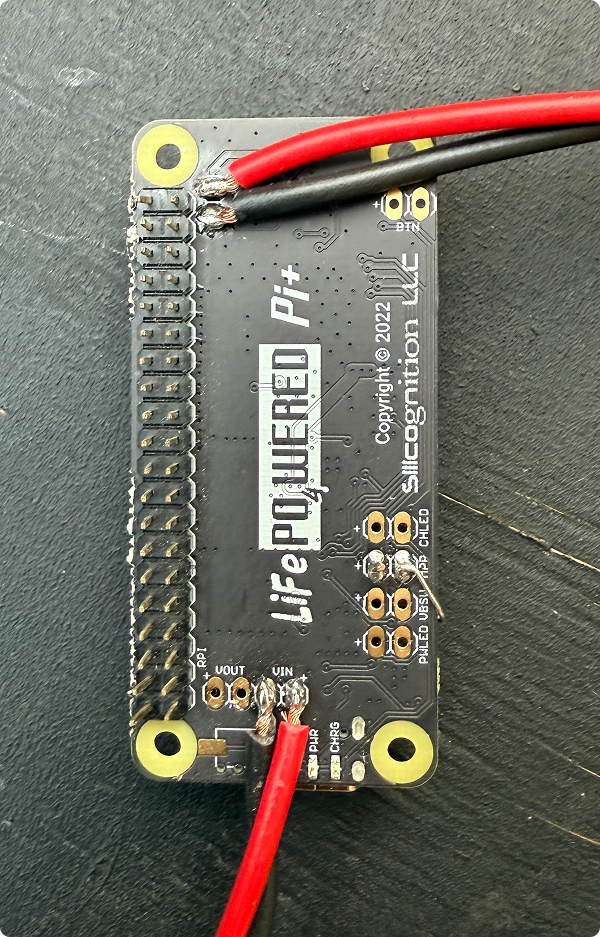
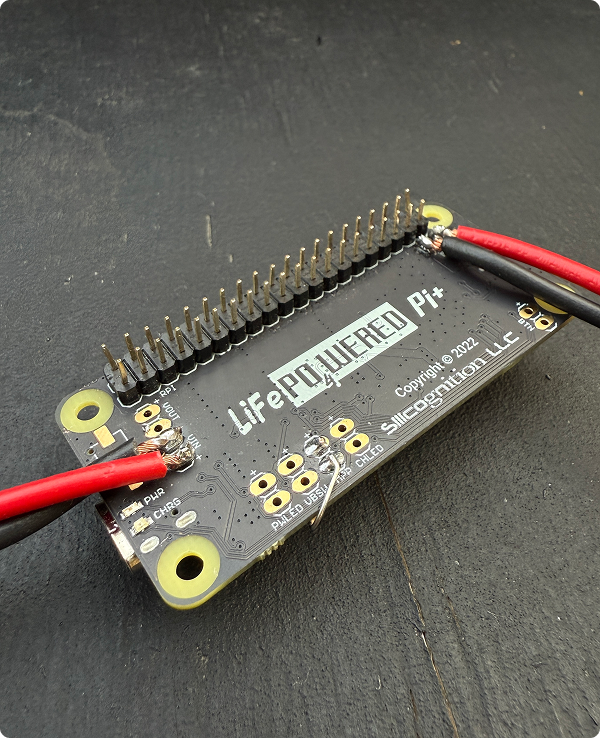
Proper wiring is crucial for efficiency and safety in solar power systems. Here's how I approached the wiring:
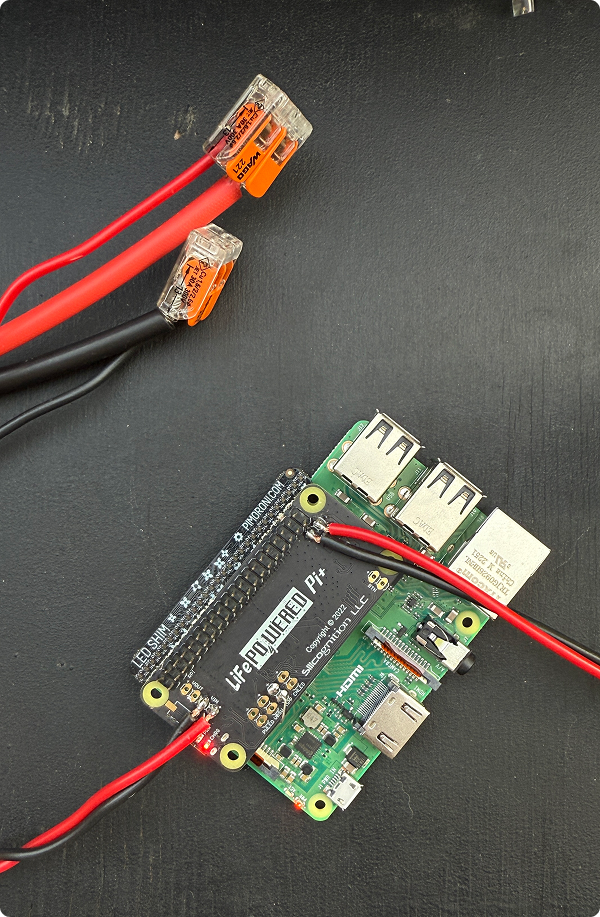
I used 10 AWG solar extension cables for the long run from the solar panel to the terminal blocks. This heavy gauge minimizes voltage drop over the 20-foot distance. For the shorter connections between the terminal block and the LiFePO4wered-Pi HAT, I stepped down to 14 AWG wire, which is sufficient for the shorter distance and lower current.
The voltage drop calculation is important because excessive voltage drop can significantly reduce the charging efficiency. With my 10 AWG wire over 20 feet, the voltage drop under full load is approximately 2.5%, which is within acceptable limits.
For connections, I used Wago 221-612 lever nuts, which provide secure solderless connections that can be easily adjusted if needed.
I chose the Raspberry Pi 3B+ for this project because it offers a good balance of performance and power efficiency. Here's how to set it up:
First, we need to install Raspberry Pi OS and configure basic settings:
After booting up your Raspberry Pi, SSH into it and perform the initial configuration:
    # Update system packages
    sudo apt-get update
    sudo apt-get upgrade

    # Set hostname
    sudo raspi-config

    # Navigate to: 1. System Options → S4 Hostname
    # Enter: webserverpi
    sudo reboot

    # SSH back in with new hostname
    ssh [email protected]

    # Expand filesystem to use full SD card
    sudo raspi-config

    # Navigate to: 6. Advanced Options → A1 Expand Filesystem
    # Verify with:
    df -h

    # Set correct timezone
    sudo dpkg-reconfigure tzdata

    # confirm correct time
    date
    # Add new user and set password
    sudo useradd -m NAME -G sudo
    sudo passwd NAME

    # Add user to video group (for hardware access)
    sudo adduser NAME video

    # Install Git
    sudo apt-get install git-core
To maximize battery life, disable unnecessary hardware features:
    # Disable HDMI output to save power
    sudo nano /etc/rc.local

    # Add this line before "exit 0":
    /usr/bin/tvservice -o

    # Should look like:
    #!/bin/sh -e
    /usr/bin/tvservice -o
    exit 0
To keep everything tidy and easily maintainable, I recommend the following folder structure on your Raspberry Pi:
/srv/
├── scripts/                   # Custom bash scripts (e.g. deploy_website.sh, battery_monitor.py)
│   ├── deploy_website.sh
│   └── battery_monitor.py
├── source/                    # Source code for your website and apps
│   └── website/     # Your web project folder
│       ├── docker-compose.yaml
│       ├── .settings.env
│       └── index.html etc             # Static files served to the web
│
└── logs/                      # Optional: log files or output from scripts (e.g. battery logs)
This structure separates code, scripts, and logs — making it easier to manage backups, deployments, and updates. You can create these folders with the following commands:
sudo mkdir -p /srv/scripts /srv/source /srv/logs
sudo chown -R NAME:NAME /srv/
The LiFePO4wered-Pi+ solar charger HAT is the heart of this setup. It manages power delivery, battery charging, and system wake/sleep cycles.
    # Navigate to source directory
    cd /srv/source

    # Clone the repository
    git clone https://github.com/xorbit/LiFePO4wered-Pi.git
    cd LiFePO4wered-Pi/

    # Build and install
    make all
    sudo make user-install

    # Add user to i2c group for hardware access
    sudo usermod -aG i2c NAME
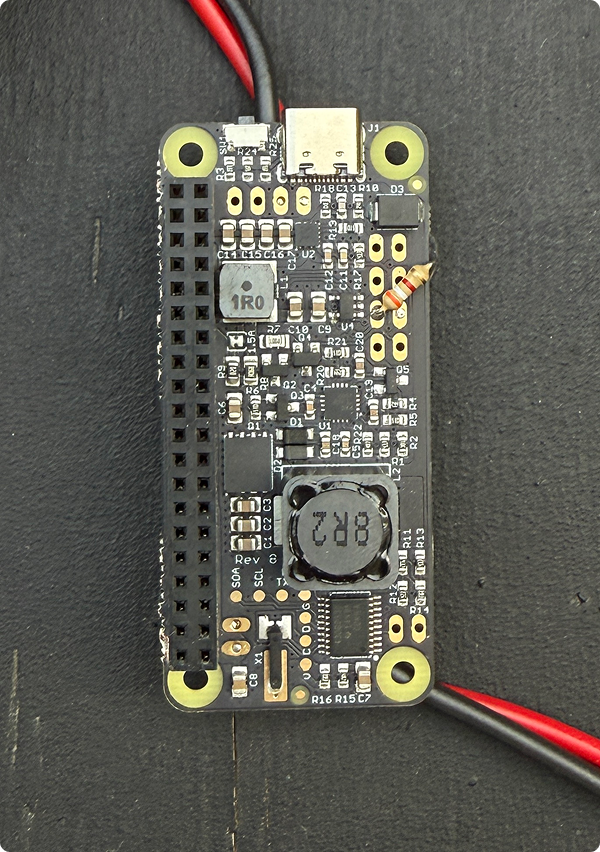
The LiFePO4wered-Pi+ requires a resistor to optimize charging based on your solar panel's Maximum Power Point voltage:
Formula: RMPP = 51815 / (VMPP – 4.66)
With my panel's VMPP of 7.38V:
RMPP = 51815 / (7.38 – 4.66) = 51815 / 2.72 ≈ 19,050 ohms (19 kΩ)
However, after testing, I found that this resistor value required too high a voltage (7.38V) to charge effectively. I switched to a 38 kΩ resistor which sets the charge voltage to 6.33V and works much better in real-world conditions.
With the hardware in place, it's time to configure the software components:
    # Set auto-boot to enable booting when power is sufficient
    lifepo4wered-cli set AUTO_BOOT 2

    # Set battery voltage threshold for booting (75% capacity)
    lifepo4wered-cli set VBAT_BOOT 3325

    # Turn off LED to save power
    lifepo4wered-cli set LED_STATE 0x00

    # Write settings to flash
    lifepo4wered-cli set CFG_WRITE 0x46
    # Install Docker
    curl -sSL https://get.docker.com | sh
    sudo usermod -aG docker NAME

    # Install Docker Compose
    sudo apt install -y docker-compose
    # Create scripts directory
    sudo mkdir -p /srv/scripts
    sudo chown -R NAME:NAME /srv/scripts

    # Create deployment script
    nano /srv/scripts/deploy_website.sh

    # Add the following content:
    #!/bin/bash
    cd /srv/source/ryanmcclure.earth
    git pull origin main
    docker compose down
    docker compose up -d

    # Make the script executable
    chmod +x /srv/scripts/deploy_website.sh
Create a docker-compose.yaml file for your website:
    version: "3.3"

    services:
      web:
        image: joseluisq/static-web-server:latest
        container_name: web
        env_file: ./.settings.env
        ports:
          - 8080:80
        volumes:
          - ./web:/public:ro
        restart: unless-stopped
        command: -g info

      watchtower:
        image: containrrr/watchtower:latest
        container_name: watchtower
        volumes:
          - /var/run/docker.sock:/var/run/docker.sock
        restart: unless-stopped

      cloudflared:
        image: cloudflare/cloudflared:latest
        container_name: cloudflared
        restart: unless-stopped
        network_mode: host
        command: tunnel --no-autoupdate run --token ${CF_WEB_TOKEN}
        depends_on:
          - web
I created a Python script that runs every 10 minutes to check the battery status and write it to a JSON file for the website to use:
# Example Python script for monitoring (save as battery_monitor.py)
    import subprocess
    import json
    import time
    import os
    from datetime import datetime

    # Function to get data from LiFePO4wered-Pi
    def get_battery_data():
        try:
            # Get battery voltage
            vbat_raw = subprocess.check_output(['lifepo4wered-cli', 'get', 'VBAT'])
            vbat = int(vbat_raw.strip()) / 1000.0  # Convert to volts

            # Calculate percentage (rough approximation)
            # 3.0V is ~0%, 3.4V is ~100%
            percentage = max(0, min(100, (vbat - 3.0) / 0.4 * 100))

            # Get load (current consumption)
            load_raw = subprocess.check_output(['lifepo4wered-cli', 'get', 'IOUT'])
            load = int(load_raw.strip())

            # Get CPU temperature
            temp_raw = subprocess.check_output(['vcgencmd', 'measure_temp'])
            temp = temp_raw.decode('utf-8').replace('temp=', '').replace("'C", '')

            # Get uptime
            uptime_seconds = float(open('/proc/uptime').read().split()[0])

            return {
                'percentage': round(percentage),
                'voltage': round(vbat, 2),
                'load': load,
                'temperature': float(temp),
                'uptime': round(uptime_seconds),
                'timestamp': datetime.now().isoformat()
            }
        except Exception as e:
            print(f"Error getting battery data: {e}")
            return {
                'percentage': 0,
                'voltage': 0,
                'load': 0,
                'temperature': 0,
                'uptime': 0,
                'timestamp': datetime.now().isoformat(),
                'error': str(e)
            }

    # Main execution
    if __name__ == "__main__":
        data = get_battery_data()

        # Write to JSON file in web directory
        with open('/srv/source/ryanmcclure.earth/web/solar.json', 'w') as f:
            json.dump(data, f)

        print(f"Battery at {data['percentage']}%, {data['voltage']}V")
Set up a systemd service to run this script every 10 minutes:
# Create service file
    sudo nano /etc/systemd/system/battery-monitor.service

    # Add the following content:
    [Unit]
    Description=Battery Monitor Service
    After=network.target

    [Service]
    Type=simple
    User=[NAME] << EDIT
    ExecStart=/usr/bin/python3 /srv/scripts/battery_monitor.py
    Restart=on-failure

    [Install]
    WantedBy=multi-user.target

    # Create timer file
    sudo nano /etc/systemd/system/battery-monitor.timer

    # Add the following content:
    [Unit]
    Description=Run Battery Monitor every 10 minutes

    [Timer]
    OnBootSec=1min
    OnUnitActiveSec=10min
    Unit=battery-monitor.service

    [Install]
    WantedBy=timers.target

    # Enable and start the timer
    sudo systemctl enable battery-monitor.timer
    sudo systemctl start battery-monitor.timer
Cloudflare Tunnels allow you to expose your local web server to the internet without opening ports on your router or requiring a static IP address.
webserverpi)..settings.env file.Your .settings.env file should include:
CF_WEB_TOKEN=your-cloudflare-tunnel-token-here
This method offers:
These commands help you keep track of your system's performance and stability:
Use the LiFePO4wered-Pi+ CLI to check battery voltage and load:
  # Get battery voltage
  lifepo4wered-cli get VBAT

  # Get current draw (load)
  lifepo4wered-cli get IOUT

  # View all battery parameters
  lifepo4wered-cli get
Monitor and troubleshoot your running containers:
  # List running containers
  docker ps

  # View logs for the web server
  docker logs web

  # View logs for Cloudflare tunnel
  docker logs cloudflared
Update packages when your battery is charged enough:
  # Update system safely
  sudo apt update && sudo apt upgrade
Deploy your latest site changes with a single command:
  # Local deployment
  /srv/scripts/deploy_website.sh

  # Remote deployment (via SSH)
  ssh [email protected] "/srv/scripts/deploy_website.sh"
Here's a quick reference for common tasks during development and debugging:
  # Find Pi's IP address
  arp -a

  # SSH into the Raspberry Pi
  ssh [email protected]

  # Check disk space usage
  df -h

  # Measure CPU temperature
  vcgencmd measure_temp

  # Live power monitoring
  watch -n 1 "lifepo4wered-cli get VBAT && lifepo4wered-cli get IOUT"

  # Restart Docker container
  docker restart web

  # View website logs
  docker logs web

  # View Cloudflare tunnel logs
  docker logs cloudflared

  # Pull latest code
  cd /srv/source/folder-name && git pull origin main